📕 Science‑Backed Bodybuilding Workouts for the Gastrocnemius & Soleus Muscles
📕Meta Description
Learn the anatomy, function, and best science‑supported bodybuilding exercises for the gastrocnemius and soleus muscles. Discover how to build stronger, more defined calves with practical tips, research insights, and beginner‑friendly explanations.

📕 Introduction: Why The Calves Matter More Than You Think
The calves are one of the most stubborn muscle groups in bodybuilding—but also one of the most important. Whether you want powerful athletic performance, sculpted lower legs, or better stability and balance, training the gastrocnemius and soleus muscles with science‑backed methods can transform your physique.
This guide breaks everything down in simple, friendly language so anyone can understand and apply it.
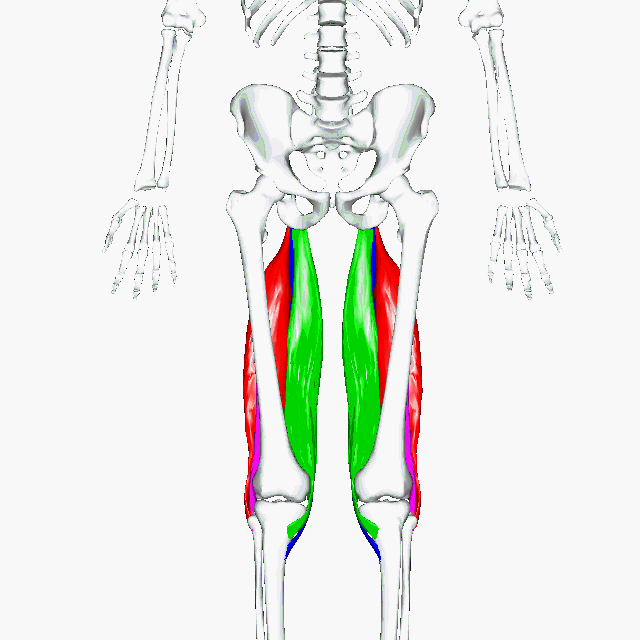
📕Muscle Location: Where Are the Gastrocnemius & Soleus Muscles?
The calf region contains two major muscles - the gastrocnemius and the soleus. Together, they attach from the femur and tibia down to the Achilles tendon, enabling powerful lower‑leg movement.
Gastrocnemius — the large, visible calf muscle forming the rounded shape.
- Soleus — a deeper, flatter muscle underneath the gastrocnemius.
📕 Anatomy Breakdown: Gastrocnemius Anatomy
The gastrocnemius has two heads that create the iconic “diamond‑shaped” calf appearance.
Medial head (inner calf)
Lateral head (outer calf)
Gastrocnemius Function
Plantar flexion (pointing toes downward)
Knee flexion assistance
High involvement in sprinting, jumping, and explosive movements
Plantar flexion (pointing toes downward)
Knee flexion assistance
High involvement in sprinting, jumping, and explosive movements
Soleus Anatomy
The soleus :
- sits beneath the gastrocnemius.
- is composed mostly of slow‑twitch muscle fibers.
- contributes significantly to calf thickness and endurance.
Soleus Muscle Function & Movements
Plantar flexion with the knee bent.
Plantar flexion is the medical term for pointing your toes downward, away from your shin. You use this movement whenever you stand on your tiptoes, press a car's gas pedal, or walk. It is powered by your calf muscles.
The soleus muscle is crucial for posture, balance, and endurance activities like walking.
📕 Calf Muscle Workout Research Findings (Simplified)
Recent studies show:
Straight‑leg calf raises activate the gastrocnemius more strongly.
Bent‑leg calf raises significantly increase soleus activation.
Full range of motion leads to greater hypertrophy than partial reps.
Slow eccentrics improve muscle fiber recruitment and growth.
High‑frequency calf training produces better results than once‑weekly sessions.
📕 Two Science‑Backed Bodybuilding Exercises for the Calves
1. Standing Calf Raise (Gastrocnemius Focus)
Why the standing calf raise works:
The standing calf raise places the knee in an extended position, maximizing gastrocnemius activation. Research shows that straight‑leg plantar flexion (pointing toes to the floor) produces significantly higher gastrocnemius engagement.
How to do the standing calf raise:
- Stand on a platform with your heels hanging off.
- Rise onto your toes,
- pause, and
- lower slowly for a full stretch.
Science note: Studies indicate that full range of motion and slow eccentrics increase hypertrophy.
2. Seated Calf Raise (Soleus Focus)
Why the seated calf raise works
The seated calf raise works because bending the knee to roughly 90 degrees reduces the involvement of the gastrocnemius—whose fibers cross both the knee and ankle—and shifts the mechanical load almost entirely onto the soleus, a deep, slow‑twitch‑dominant muscle responsible for endurance‑based plantar flexion.
This position isolates the soleus by placing it under continuous tension through the full range of motion, allowing it to generate force without assistance from the larger gastrocnemius.
Since the soleus contains a high percentage of fatigue‑resistant fibers, it responds best to high‑rep, controlled training, making the seated calf raise one of the most effective exercises for building thick, strong, well‑developed lower calves.
How to do the seated calf raise:
- Sit with knees bent at 90 degrees,
- weight resting on your thighs.
- Lift your heels,
- squeeze, and
- lower under control.
Science note: Because the soleus is slow‑twitch dominant, higher reps (15–25) are ideal.
📕Goals & Transformations You Can Expect From Calf Exercises
1. Bigger, More Defined Calves
Targeting both muscles ensures balanced growth and fuller calf development.
2. Improved Athletic Performance
Stronger calves enhance sprinting, jumping, and change‑of‑direction speed.
3. Better Balance & Stability
The soleus plays a major role in posture and ankle stability.
4. Enhanced Lower‑Body Strength
Calves support heavy lifts like squats and deadlifts.
📕 Practical Advice for Better Calf Muscle Training
Train calves 2–4 times per week for optimal growth.
Use progressive overload—increase weight, reps, or tempo.
Combine straight‑leg and bent‑leg movements.
Prioritize full stretch and full contraction.
Use slow eccentrics (3–4 seconds lowering).
Mix rep ranges:
Gastrocnemius: 8–15 reps
Soleus: 15–25 reps
Don’t rush—calves respond best to controlled movement.
📕 Conclusion
The gastrocnemius and soleus are powerful, complex muscles that respond best to targeted, science‑backed training. By combining standing and seated calf raises—and applying progressive overload—you can build stronger, fuller, more athletic calves.
Whether you're a beginner or seasoned lifter, these principles will help you grow safely and effectively.
📕 Calf Muscle Workouts FAQ Section
1. How often should I train my calves?
Two to four times weekly works best for most people.
2. Why are calves so hard to grow?
They’re used constantly during daily movement, so they require higher training volume and intensity.
3. Do genetics affect calf size?
Yes, but smart training can significantly improve shape and size.
4. Should I train calves heavy or light?
Both—heavy loads for gastrocnemius, higher reps for soleus.
5. Are machines or free weights better?
Both work well; consistency and technique matter more.
📕 References
American Council on Exercise. (2020). Calf muscle biomechanics and training principles. https://www.acefitness.org
Beardsley, C. (2017). The science of calf training: Gastrocnemius vs. soleus activation. https://www.researchgate.net
Schoenfeld, B. J. (2010). The mechanisms of muscle hypertrophy and their application to resistance training. https://journals.lww.com
Wakahara, T., Fukutani, A., & Kawakami, Y. (2013). Muscle activation differences between gastrocnemius and soleus during plantar flexion. https://www.ncbi.nlm.nih.gov (ncbi.nlm.nih.gov in Bing)